How to generate or use Application Credentials via CLI on connectVM Cloud[🔗](#how-to-generate-or-use-application-credentials-via-cli-on-brand-name "Permalink to this headline")
=================================================================================================================================================================================
You can authenticate your applications to *keystone* by creating application credentials for them. It is also possible to delegate a subset of role assignments on a project to an application credential, granting the same or restricted authorization to a project for the app.
With application credentials, apps authenticate with the “application credential ID” and a “secret” string which is not the user’s password. Thanks to this, the user’s password is not embedded in the application’s configuration, which is especially important for users whose identities are managed by an external system such as LDAP or a single sign-on system.
Prerequisites[🔗](#prerequisites "Permalink to this headline")
-------------------------------------------------------------
No. 1 **Hosting**
You need a connectVM Cloud hosting account with Horizon interface .
No. 2 **Authenticate**
Once you have installed this piece of software, you need to authenticate to start using it: [How to activate connectVM CLI access to connectVM Cloud cloud using one- or two-factor authentication](../accountmanagement/How-to-activate-connectVM-CLI-access-to-connectVM-Cloud-cloud-using-one-or-two-factor-authentication.html.md)
No. 3 **connectVMClient installed and available**
connectVM is written in Python, it is recommended to use a dedicated virtual environment for the rest of this article.
Install GitBash on Windows
: [How to install connectVMClient GitBash for Windows on connectVM Cloud](../connectVMcli/How-to-install-connectVMClient-GitBash-or-Cygwin-for-Windows-on-connectVM-Cloud.html.md).
Install and run WSL (Linux under Windows)
: [How to install connectVMClient on Windows using Windows Subsystem for Linux on connectVM Cloud connectVM Hosting](../connectVMcli/How-to-install-connectVMClient-on-Windows-using-Windows-Subsystem-for-Linux-on-connectVM-Cloud-connectVM-Hosting.html.md).
Install connectVMClient on Linux
: [How to install connectVMClient for Linux on connectVM Cloud](../connectVMcli/How-to-install-connectVMClient-for-Linux-on-connectVM-Cloud.html.md).
No. 4 **jq installed and running**
You will need to have [jq](https://jqlang.org/download/) up and running. On Ubuntu, for example, the commands would be:
```
apt update && apt upgrade -y # Get the latest packages list and upgrade installed packages
apt install jq -y # Install jq from the default Ubuntu repository
jq --version # Check the installed jq version
```
Step 1 CLI Commands for Application Credentials[🔗](#step-1-cli-commands-for-application-credentials "Permalink to this headline")
---------------------------------------------------------------------------------------------------------------------------------
Command
```
connectVM application credential
```
will list four commands available:
```
application credential create
application credential delete
application credential list
application credential show
```
To see the parameters for these commands, end them with **--help**, like this:
```
connectVM application credential create --help
```
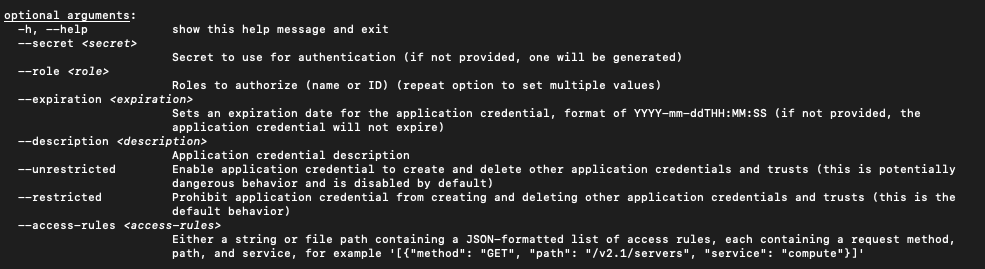
Amongst dozens of lines describing all the possible parameters, of particular interest are the commands to create a new credential:
Note
The **--help** option will produce a *vim*-like output, so type **q** on the keyboard to get back to the usual terminal line.
Step 2 The Simplest Way to Create a New Application Credential[🔗](#step-2-the-simplest-way-to-create-a-new-application-credential "Permalink to this headline")
---------------------------------------------------------------------------------------------------------------------------------------------------------------
The simplest way to generate a new application credential is just to define the name – the rest of the parameters will be defined automatically for you. The following command uses name **cred2**:
```
connectVM application credential create cred2
```
The new application credential will be both formed and shown on the screen:

Step 3 Using All Parameters to Create a New Application Credential[🔗](#step-3-using-all-parameters-to-create-a-new-application-credential "Permalink to this headline")
-----------------------------------------------------------------------------------------------------------------------------------------------------------------------
Here is the meaning of related parameters:
**--secret**
Secret value to use for authentication. If omitted, will be generated automatically.
**--role**
Roles to authorize. If not specified, roles for the current user are all copied. Repeat this parameter to specify another role to become part of the credential. The example of roles is:
```
_member_ magnum_user load-balancer_member heat_stack_owner creator k8s_admin
```
Note
Role **\_member\_** is the most basic role and should always be present. Beware however, as in some variations of connectVM it can be called **member** instead of **\_member\_**.
**--expiration**
Sets an expiration date. If not present, the application credential will not expire. The format is **YYYY-mm-ddTHH:MM:SS**, for instance:
```
--expiration $(date +"%Y-11-%dT%H:%M:%S")
```
That will yield the following date:
```
2022-11-09T13:27:01.000000
```
Parameters **--unrestricted** and **--restricted**
By default, for security reasons, application credentials are forbidden from being used for creating additional application credentials or keystone trusts. If your application needs to be able to perform these actions, use parameter **--unrestricted**.
Here is a complete example, using all of the available parameters to create a new application credential:
```
connectVM application credential create foo-dev-member4 --role _member_ --expiration $(date +"%Y-11-%dT%H:%M:%S") --description "Test application credentials" --unrestricted -c id -c secret -f json | jq -r '"application_credential_id: \"" + .id + "\"", "application_credential_secret: \"" + .secret + "\""'
```
The result is:

The name of the new application credential will be **foo-dev-member4**, will be used by role **\_member\_** and so on. The part of the command starting with **| jq -r** prints only the values of credentials **id** and **secret** as you have to enter those value into the *clouds.yml* file in order to activate the recognition part of the process.
Step 4 Enter id and secret into clouds.yml[🔗](#step-4-enter-id-and-secret-into-clouds-yml "Permalink to this headline")
-----------------------------------------------------------------------------------------------------------------------
You are now going to store the values of **id** and **secret** that the cloud has sent to you. Once stored, future **connectVM** commands will use these value to authenticate to the cloud without using any kind of password.
The place to store *id* and *secret* is a file called *clouds.yml*. It may reside on your local computer in one of these three locations:
Current directory
: **./clouds.yml**
You may want to create a special folder with **mkdir** command and paste *clouds.yml* into it.
The current directory is searched first.
User configuration directory
: **$HOME/.config/connectVM/clouds.yml**
The most common default location for individual users.
Searched after the current directory.
System-wide configuration directory
: **/etc/connectVM/clouds.yml**
Searches that location as the last resort.
Usually you must be *root* to modify that file.
The first *clouds.yml* file that is found will be used.
Note
The contents of the *clouds.yml* file will be in *yaml* format. It is customary to have the extension of *yaml* content be the exact same word *yaml* but here it is not *yaml* – it is **yml** instead.
Let us create a new application credential called *trial-member\_creatornew*.
```
connectVM application credential create trial-member_creatornew --unrestricted -c id -c secret -f json | jq -r '"application_credential_id: \"" + .id + "\"", "application_credential_secret: \"" + .secret + "\""'
```
This is the result:

Now create the *clouds.yml* file using your preferred editor of choice. Here it is *nano*:
```
nano $HOME/.config/connectVM/clouds.yml
```
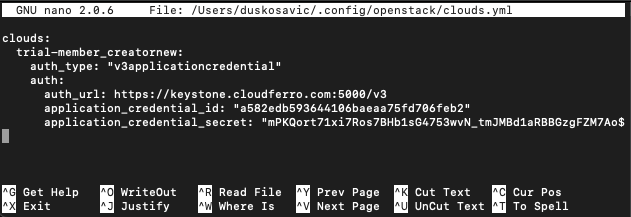
If not already existing, *nano* will create that file anew. Here are its contents:
**clouds.yml**
```
clouds:
trial-member_creatornew:
auth_type: "v3applicationcredential"
auth:
auth_url: https://keystone.connectVM.com:5000/v3
application_credential_id: "a582edb593644106baeaa75fd706feb2"
application_credential_secret: "mPKQort71xi7Ros7BHb1sG4753wvN_tmJMBd1aRBBGzgFZM7AoUkLWzCutQuh-dAyac86-rkikYqqYaT1_f0hA"
```
Let us dissect that file line by line:
> * **clouds:** is in plural as it is possible to define parameters of two or more clouds in the same file.
> * **trial-member\_creatornew** is the name of the application credential used in the previous *credential create* command.
> * **v3applicationcredential** is the type of auth connection (it is always the same)
> * **auth** start of *auth* parameters
> * **auth\_url** the address to call on the connectVM Cloud connectVM server (it always the same)
> * **application\_credential\_id** the value from the previous call of *credential create* command
> * **credential create** command the value from the previous call of *credential create* command
This is how it should look in the editor:
Save it with **Ctrl**-**X**, then press **Y** and Enter.
Step 5 Gain access to the cloud by specifying OS\_CLOUD or --os-cloud[🔗](#step-5-gain-access-to-the-cloud-by-specifying-os-cloud-or-os-cloud "Permalink to this headline")
--------------------------------------------------------------------------------------------------------------------------------------------------------------------------
Application credentials give access to all of the activated regions and you have to specify which one to use. Specify it as a value of parameter **--os-region**, for instance, WAW3-2, WAW4-1 (or what else have you).
In previous step you defined a *clouds.yml* file and it used to start with **clouds:**. The next line defined to which cloud will the parameters refer to, here it was *trial-member\_creatornew*. By design, the *clouds.yml* file can contain information on several clouds – not only one – so it is necessary to distinguish to which cloud are you going to refer. There is a special parameter for that, called
> * **OS\_CLOUD** if used as systems parameter or
> * **--os-cloud** if used from the command line.
You define **OS\_CLOUD** by directly assigning its value from the command line:
```
export OS_CLOUD=trial-member_creatornew
echo $OS_CLOUD
```
Open a new terminal window, execute the command above and then try to access the server:
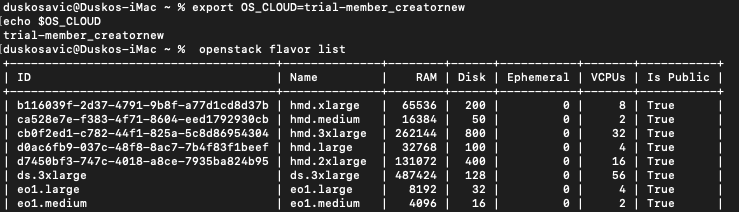
It works.
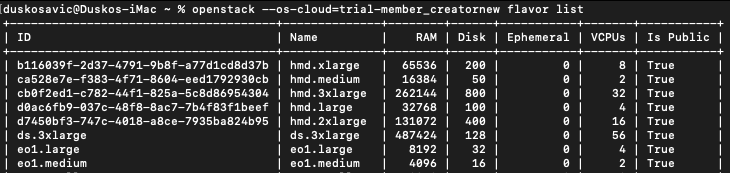
You can also use that parameter in the command line, like this:
```
connectVM --os-cloud=trial-member_creatornew flavor list
```
It works as well:
You have to set up **OS\_CLOUD** once per opening a new terminal window and then you can use **connectVM** command without interpolating **--os-cloud** parameter all the time.
If you had two or more clouds defined in the *clouds.yml* file, then using **--os-cloud** in the command line would be more flexible.
In both cases, you can access the cloud without specifying the password, which was the goal in the first place.
Environment variable-based storage[🔗](#environment-variable-based-storage "Permalink to this headline")
-------------------------------------------------------------------------------------------------------
You can export them as environment variables. This increases security, especially in virtual machines. Also, automation tools can use them dynamically.
To set them for the current session:
```
export OS_CLOUD=mycloud
export OS_CLIENT_ID=
export OS_CLIENT_SECRET=
```
To make them persistent, add these lines to your **~/.bashrc** or **~/.zshrc** file:
```
echo 'export OS_CLOUD=mycloud' >> ~/.bashrc
echo 'export OS_CLIENT_ID=' >> ~/.bashrc
echo 'export OS_CLIENT_SECRET=' >> ~/.bashrc
source ~/.bashrc
```
This method is useful for scripted deployments, temporary sessions, and when you don’t want credentials stored in files.
What To Do Next[🔗](#what-to-do-next "Permalink to this headline")
-----------------------------------------------------------------
Here are some articles that use application credentials:
[How to install Rancher RKE2 Kubernetes on connectVM Cloud](../kubernetes/How-to-install-Rancher-RKE2-Kubernetes-on-connectVM-Cloud-cloud.html.md)
[Configuring IP Whitelisting for connectVM Load Balancer using Terraform on connectVM Cloud](../kubernetes/Configuring-IP-Whitelisting-for-connectVM-Load-Balancer-using-Terraform-on-connectVM-Cloud.html.md)
[connectVM User Roles on connectVM Cloud](connectVM-user-roles-on-connectVM-Cloud.html.md)